How to Build an Iron Farm in Minecraft 1.21
Complete step-by-step guide to building an iron farm that produces 330+ iron per hour • Updated February 2026
Iron farms are one of the most useful contraptions you can build in Minecraft. They provide a renewable source of iron, which is essential for tools, armor, hoppers, and many other items. Instead of spending hours mining underground, you can create a farm that automatically generates iron for you.
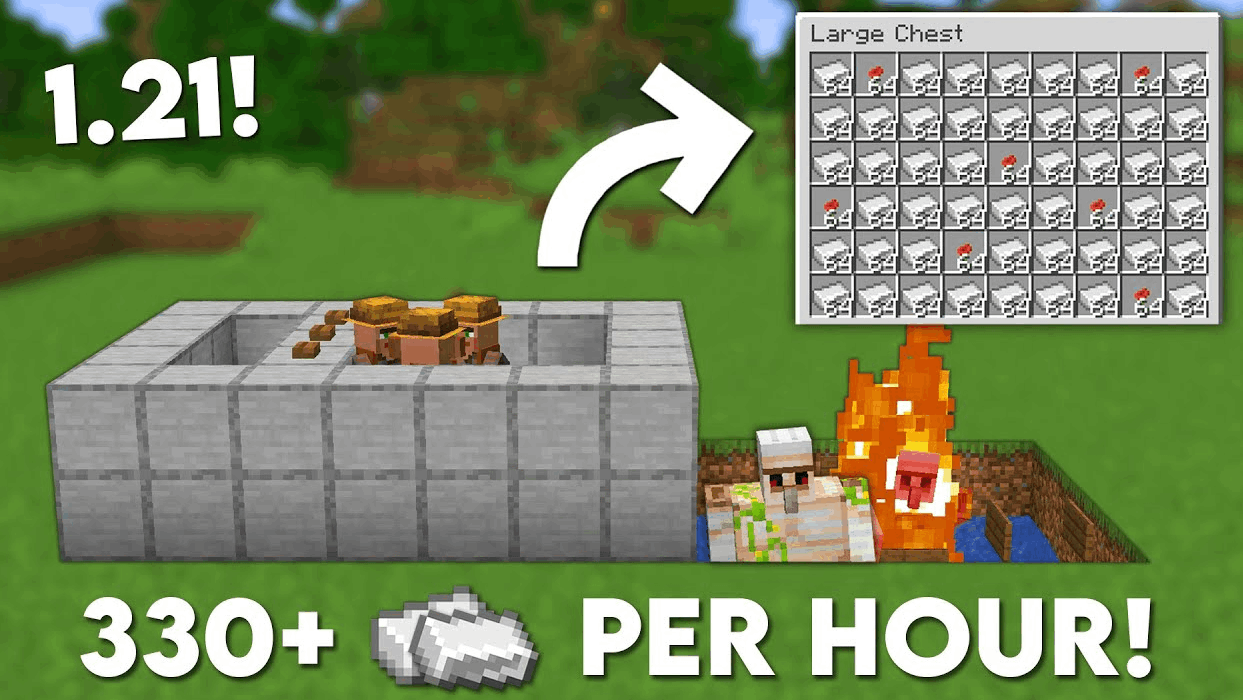
This guide will walk you through building an efficient iron farm based on Voltrox's design that produces 330+ iron per hour. It's relatively simple to build but provides an excellent return on investment.
Version Compatibility
Understanding Iron Golem Mechanics
Iron golems spawn based on villager "gossip" and village conditions:
- You need at least 3 villagers
- Each villager needs to be linked to a bed
- Villagers need access to workstations
- A valid 3×4×3 space is needed for the golem to spawn
- Villages attempt to spawn an iron golem every 35 seconds if conditions are met
- Villagers need to be scared (zombie nearby) for optimal spawn rates
- 3 villagers with beds and workstations meet minimum requirements
- Zombie scares villagers, increasing golem spawn rate
- Spawning platform ensures golems spawn in the right location
- Lava killing mechanism is efficient and doesn't require redstone
Video Tutorial
Credit: Tutorial by Voltrox on YouTube. Follow along with the video for detailed building instructions.
Materials Needed
- Stone/Cobblestone~100 blocks
- Wood (any type)~50 blocks
- Wool (any color)~20 blocks
- Glass~30 blocks
- Hoppers3-5
- Chest1-2
- Villagers3
- Zombie1
- Beds3
- Workstations3
- Lava Bucket1
- Water Bucket1
- Name Tags4
Step-by-Step Building Guide
- Build a 3×3×4 enclosed room using solid blocks (stone, cobblestone, or wood). This will house your villagers.
- Place 3 beds inside the pod, spaced evenly so each villager can access one.
- Add 3 workstations (any type: lecterns, brewing stands, composters, etc.) next to each bed.
- Create a small entrance to bring villagers in, then seal it completely afterward.
- Make sure the ceiling is solid so villagers can't escape.
- Build a small 2×2×2 glass chamber above or next to the villager pod where villagers can see the zombie.
- Lure a zombie into the chamber and name it with a name tag to prevent despawning.
- Seal the chamber completely. The zombie must be visible to villagers but unable to reach them.
- Ensure there's at least 1 block gap between the zombie and villagers.
- Above the villager pod, create a 16×16 flat platform made of solid blocks (like stone or wood).
- The platform should be 3-4 blocks above the villagers' heads.
- Make sure the platform is well-lit to prevent other mob spawns.
- In the center of the platform, create a 3×3 hole where golems will fall through to the killing chamber.
- Below the 3×3 hole in the spawning platform, build a 3×3 chamber that's 4-5 blocks tall.
- At the top of this chamber (where golems fall in), place a lava source block so it flows down one block.
- Place signs or trapdoors 2 blocks below the lava to stop it from flowing all the way down.
- This creates a "lava blade" that kills golems without destroying the drops.
- At the bottom of the killing chamber, place hoppers to collect iron and poppies.
- Connect the hoppers to a chest (or double chest) for storage.
- Make sure all drops can reach the hoppers - you may need to add water streams if needed.
- Test the collection system by throwing items down the shaft to ensure they reach the chest.
- Bring 3 villagers into the villager pod (use boats or minecarts for easy transport).
- Name each villager with a name tag to prevent despawning.
- Seal the villager pod completely - no gaps or openings.
- Light up the surrounding area (80 block radius) to prevent interference from other villages.
- Wait for villagers to link to beds and workstations (green particles appear).
- After a few minutes, iron golems should start spawning!
Important Notes
- Light up the area around your farm to prevent other mob spawns
- Ensure there are no other villages within 80 blocks that could interfere
- The farm needs to be in loaded chunks to work - stay within 128 blocks
- Be patient - it may take 5-10 minutes for the first golem to spawn
Iron Production Calculator
Use this calculator to plan your iron production and see what you can craft with the iron from your farm.
Iron Production Calculator
Total Iron Production: 10,560 iron ingots
Production
Per Day
7,920 iron
Per Week
55,440 iron
Per Month
237,600 iron
Iron Blocks Per Day
880 blocks
Crafting
Iron Blocks
1,173
Hoppers
2,112
Minecarts
2,112
Anvils
340
Full Armor Sets
440
Iron Doors
1,760
Projects
Storage System
Requirements
64 hoppers (320 iron)
Can Build
33x
Railway System
Requirements
8 minecarts, 4 hopper minecarts (60 iron)
Can Build
176x
Iron Golem Army
Requirements
10 iron golems (360 iron)
Can Build
29x
Troubleshooting Common Issues
- Check villagers: All 3 villagers must have valid beds and workstations with green particles
- Verify zombie: Zombie must be visible to villagers and named to prevent despawning
- Spawning space: Ensure there's a clear 3×4×3 space for golems to spawn
- Distance: Check that there are no other villages within 80 blocks
- Time: Wait at least 10-15 minutes for the first golem
- Villager gossip: Make sure villagers can "see" the zombie and are scared
- Bed access: All villagers must be able to pathfind to their beds
- Workstation time: Villagers need to work at their stations during work hours
- Chunk loading: Stay within 128 blocks or use chunk loaders
- Lava height: Make sure lava kills golems but doesn't burn drops
- Hopper connection: Verify hoppers are properly connected to chest
- Drop collection: All drops must be able to reach hoppers (use water if needed)
- Villagers dying: Ensure zombie can't reach villagers (glass/solid blocks between)
- Not linking: Remove and replace beds/workstations to force relinking
- Name tags: Always name villagers to prevent despawning
Java vs. Bedrock Differences
Important
| Feature | Java Edition | Bedrock Edition |
|---|---|---|
| Minimum Villagers | 3 villagers | 10 villagers (20 for optimal rates) |
| Zombie Required | Yes (increases spawn rate) | No (not needed) |
| Spawn Platform | 16×16 recommended | 20×20 minimum |
| Spawn Rate | Every 35 seconds (if conditions met) | Random, less predictable |
| Golem Cap | Unlimited | Limited by village size |
If you're playing on Bedrock Edition, make these changes:
- Use at least 10 villagers (20 for better rates)
- Remove the zombie chamber - it's not needed in Bedrock
- Increase spawning platform to at least 20×20
- Expect lower production rates (100-200 iron/hour)
Frequently Asked Questions
This iron farm design is an excellent addition to any Minecraft world. With an output of 330+ iron per hour, you'll never have to mine for iron again. The design is relatively simple to build and doesn't require too many resources, making it accessible even for players in the early to mid-game.
Remember that iron farm designs continue to evolve with each Minecraft update. The principles outlined in this guide should remain relevant, but specific mechanics may change. Always check for the latest information when building in newer versions.
Happy farming, and enjoy your endless supply of iron!